

Professional Game Room Space Planning Tips for a Flawless Layout
Last Updated: November 2, 2026
Quick Summary
Professional game room space planning starts with measuring the room, not buying equipment, because the room's length, width, and ceiling height decide what you can own. Measure clearance from the playing surface or cabinet edge, not the wall, and keep walking paths at least 3 feet wide between zones.
- A 7-foot pool table needs about 13 by 17 feet with 4 to 5 feet of cue clearance per side.
- Plan dedicated 20-amp circuits for each major piece and space row outlets every 4 to 6 feet.
- Add 8 to 10 feet of swing and ball-flight room in front of a golf simulator screen.
- Layer ambient, task, and controlled light on separate circuits instead of one overhead fixture.
- Anchor tall cabinets and pinball machines to the wall and keep a fire extinguisher near the electrical cluster.
Table of Contents
- Start With the Room, Not the Equipment
- Luxury Game Room Layout Dimensions That Actually Work
- Zoning a Multifunctional Room Without Losing Flow
- Game Room Electrical Requirements Before You Buy
- The Best Lighting for Home Game Rooms
- Acoustics, Climate, and Safety Details Competitors Skip
- Plan Your Build With Game Supply Co
- Frequently Asked Questions
Start With the Room, Not the Equipment
Professional game room space planning tips start with a hard truth: game room space planning means the room decides what you can own, not the other way around.
At Game Supply Co, we see this constantly. Homeowners fall for a table or a simulator online, then discover the room can't hold it.
Measure three things before anything else: length, width, and ceiling height. Note door swings, window placement, and where the electrical panel sits. That data becomes your constraint list, and every later decision filters through it.
If you're at the very beginning of that process, our guide on how to plan a luxury game room walks through the room-first approach in more detail.
Luxury Game Room Layout Dimensions That Actually Work
Luxury game room layout dimensions come down to clearance, not square footage. A 20-by-20-foot room can feel cramped if equipment crowds the walking paths; a well-zoned 16-by-18 space can feel generous. The numbers below are worth writing directly onto your floor plan before you shop.
Game-by-Game Clearance and Minimum Room Sizes
Use these as planning minimums, not aspirational targets. Measure from the playing surface or cabinet edge, not from the wall.
- Pool table (7-foot or 8-foot): Allow 4 to 5 feet of cue clearance on every side, measured from the rail. A 7-foot table therefore needs a room roughly 13 by 17 feet at minimum; an 8-foot table needs about 14 by 18 feet. If you plan to use a long cue on a tight side, add 6 inches.
- Table tennis: A full-size table is 5 by 9 feet. Allow 4 to 5 feet behind each end for lunging and 3 feet on each side. That puts the practical minimum room at about 11 by 19 feet; tighter rooms force a compact or mid-size table.
- Arcade cabinets: A standard upright cabinet is about 2 to 2.5 feet wide and 2.5 to 3 feet deep. Leave 3 feet of play space in front and 2 feet between cabinets so players can stand shoulder to shoulder without bumping. A row of four cabinets needs roughly 10 to 12 feet of wall.
- Pinball machines: A standard pinball cabinet is about 2 feet wide and 4.5 feet long. Leave at least 3 feet behind the machine for the player and 2 feet between cabinets. A row of three needs about 8 to 9 feet of wall plus the rear clearance.
- Board games and card tables: A 3-foot round or square table needs 3 feet per chair side so players can push back without hitting a wall. A dedicated board game room works best at 12 by 12 feet or larger.
- Console and lounge setups: A sofa facing a screen wants 8 to 10 feet of viewing distance for a large TV, and a coffee table needs 18 inches of walkway on each side. A console zone with seating for four fits comfortably in a 10 by 12 foot area.
For a golf simulator, enclosure width and depth drive the plan.
Ceiling height is the constraint that kills more builds than any other. If your basement runs low, the low-ceiling golf simulator setup guide covers the real numbers before you commit.
Watch out: clearance measured from the wall instead of the rail or cabinet edge is the most common layout error, and it typically shows up only after the equipment is delivered.
Write these numbers on your floor plan before you buy a single piece, and mark the walking paths between zones at 3 feet minimum. If the numbers do not fit, the room is telling you to choose a smaller table or a different game, not to squeeze the clearance.
These planning minimums are worth writing onto your floor plan before you shop.
| Game | Clearance or size rule | Minimum room or wall |
|---|---|---|
| Pool table (7-foot) | 4 to 5 feet of cue clearance every side | About 13 by 17 feet |
| Pool table (8-foot) | 4 to 5 feet of cue clearance every side | About 14 by 18 feet |
| Table tennis | 4 to 5 feet behind each end, 3 feet each side | About 11 by 19 feet |
| Arcade cabinets | 3 feet play space in front, 2 feet between | 10 to 12 feet of wall for four |
| Pinball machines | 3 feet behind, 2 feet between cabinets | 8 to 9 feet of wall for three |
| Board games and card tables | 3 feet per chair side | 12 by 12 feet or larger |
| Console and lounge setups | 8 to 10 feet viewing distance, 18-inch walkways | 10 by 12 foot area |
| Golf simulator | Add 8 to 10 feet of swing and ball-flight room | Depth matters more than width |
Zoning a Multifunctional Room Without Losing Flow
Zoning is the practice of dividing one room into distinct activity zones while keeping circulation paths clear between them. Done well, a single basement holds a simulator, a pool table, and a lounge without any zone fighting another.
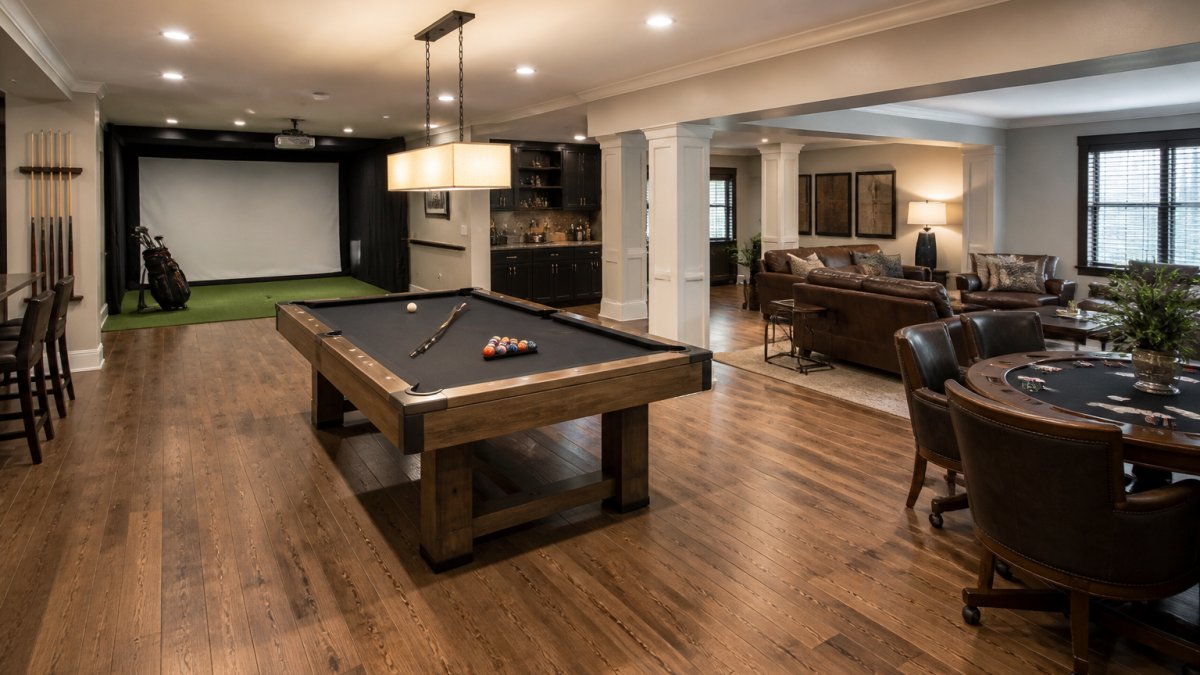
Start with the fixed elements: the simulator wall, the electrical drops, the windows. Build zones around those anchors, then draw walking paths at least 3 feet wide between them.
For tighter footprints, a bay sized to the room keeps the layout honest. The FLEX BAY enclosure gives you the depth without eating the whole floor.

Game Room Electrical Requirements Before You Buy
Game room electrical requirements are the least glamorous part of planning and the most expensive to fix later. Map power before delivery day, because moving an outlet after drywall is a patch-and-repaint job, and adding a circuit after the fact can mean opening a finished wall.
Circuit Capacity and Outlet Placement
Most homes need dedicated circuits for high-draw equipment. A simulator projector, a pinball machine, and an arcade cabinet on one shared circuit will trip breakers the first time everything runs at once.
A few practical rules of thumb from common installations:
MICRO BAY FOR SMALL ROOMS (9'H x 12'W x 2'D) →
- Golf simulator: Put the outlet behind or beside the enclosure, not in the middle of the screen wall, and add a second outlet at the tee line for a launch monitor or charging.
- Pinball and arcade row: Each machine draws modest power individually, but a row of four to six adds up. A dedicated 20-amp circuit for the row is a common pattern, with outlets spaced every 4 to 6 feet along the wall so no machine depends on a power strip.
- Entertainment console: A TV, receiver, console, and streaming box want their own circuit or a shared circuit with nothing heavy on it. Put the outlet behind the console at 18 to 24 inches above the floor, or use a recessed media box to hide the plug.
- Wet bar or mini fridge: If the room includes a bar, the refrigerator and any ice maker need their own circuit, and any sink area should have GFCI protection.
Networking matters too. Simulator software, streaming, and smart-home controls all want a wired connection. Run Ethernet to the simulator wall and the entertainment console while the walls are open.
Cable management deserves a plan of its own. Conduit behind the wall beats a bundle of cords stapled to the baseboard. For a simulator, run conduit from the projector mount to the equipment rack, and from the launch monitor position to the same rack.
The Best Lighting for Home Game Rooms
The best lighting for home game rooms is layered: ambient light for general use, task light for tables and seating, and controlled light for screens. One overhead fixture will not do the job.
Simulator rooms need dimmable ambient light so the projected image stays readable.
For projector placement, a stable overhead mount matters more than most people expect. Our universal ceiling projector mount is built to hold alignment in a simulator room, which keeps the image square session after session.

Acoustics, Climate, and Safety Details Competitors Skip
Sound control is the detail most game room guides skip, and it's the one your household will notice first. Hard surfaces bounce noise. Add acoustic panels on at least one wall, use rugs over hard flooring, and seal the door to the rest of the house.
Climate control protects the equipment.
Safety planning is straightforward but non-negotiable:
- Anchor tall cabinets and pinball machines to the wall.
- Keep a fire extinguisher near the electrical cluster.
- Use impact-rated netting around any golf bay, and check it seasonally.
- Leave the electrical panel accessible, never behind a cabinet.
The U.S. Consumer Product Safety Commission publishes anchoring guidance for furniture and appliances that applies directly to heavy game equipment.
Plan Your Build With Game Supply Co
A flawless layout comes from planning the room as one cohesive space, not from collecting machines one at a time. That's the whole argument of this guide, and it's how we approach every build.
We curate premium equipment from trusted manufacturers, from golf simulator enclosures to pinball and arcade systems, and we focus on designing the entire room rather than just individual pieces. No marketplace clutter, no low-quality imports. If you're ready to move from measurements to design, our custom home game room design ideas show what a fully planned space looks like.
Frequently Asked Questions
How much space do you need for a professional pool table?
A standard 8-foot pool table needs a room roughly 13 feet by 16 feet to allow a 4.5-foot cue stroke on every side. For a 9-foot table, plan for about 14 feet by 18 feet. Measure from the table's playing surface, not the room walls, and account for any bar-style seating or card table nearby.
What are the electrical requirements for high-end arcade and simulator equipment?
Most arcade cabinets and pinball machines draw 2 to 4 amps at 120 volts and should sit on dedicated 20-amp circuits, not shared with lighting. Golf simulators need a dedicated circuit for the projector and launch monitor, plus a separate one for the hitting bay. Plan at least four to six outlets around the perimeter and keep cabling off the floor with conduit or raceways.
What is the ideal lighting setup for a home game room?
Layer three light sources: dimmable overhead fixtures for general use, task lighting over the pool table and card table, and accent lighting for displays and arcade cabinets.
How do you balance multiple gaming zones in one room?
Divide the room into activity zones based on clearance needs first, then furniture. Put the golf bay on the longest wall, the pool table in the center with cue clearance on all sides, and seating in the remaining corner. Use rugs, flooring changes, or lighting to mark each zone, and
How do you optimize acoustics in a game room?
Hard surfaces like drywall, tile, and glass bounce sound, so add absorptive materials: area rugs under the pool table, upholstered seating, acoustic ceiling tiles, and heavy curtains on windows. Place pinball and arcade machines away from shared walls and use weatherstripping on doors. A golf simulator bay can include a foam safety valance and Elite impact screen upgrade for a more complete setup.
What size golf simulator bay fits a room with low ceilings?
A compact enclosure like the MICRO BAY at 9 feet high by 12 feet wide by 2 feet deep fits rooms with standard 9-foot ceilings and tight footprints, priced at $2,999. For more depth and a fuller swing experience, the FLEX BAY at 9 feet by 12 feet by 6 feet is $3,599. Measure ceiling height, width, and depth before ordering, and confirm your swing clearance with the manufacturer.
The gap between a room that works and one that frustrates you is almost always planning, not budget. Start with measurements, map your power and clearance needs, and choose equipment that fits the space you actually have. Game Supply Co builds around exactly that principle, with curated enclosures, mounts, and game equipment chosen for reliability and craftsmanship. Get started with Game Supply Co and build a game room that works from day one.
